最新下载
热门教程
- 1
- 2
- 3
- 4
- 5
- 6
- 7
- 8
- 9
- 10
HTML5 手势检测原理和实现示例
时间:2022-06-25 18:13:01 编辑:袖梨 来源:一聚教程网
常用的 HTML5 手势可以分为两类,单点手势和两点手势。单点手势有 tap(单击),double tap(双击),long tap(长按),swipe(挥),move(移动)。两点手势有 pinch(缩放),rotate(旋转)。
接下来我们实现一个检测这些手势的 js 库,并利用这个手势库做出炫酷的交互效果。
移动
关于移动手势检测我们在这篇博文中做过详细介绍,这里不再赘述。总结一下就是在每次touchmove事件发生时,把两个位移点之间的坐标位置相减,就可以了。
单击(tap)
手势检测的关键是用 touchstart,touchmove,touchend 三个事件对手势进行分解。
那么怎么分解单击事件呢?
在 touchstart 发生时进入单击检测,只有一个接触点。因为单击事件限制为一个手指的动作。
没有发生 touchmove 事件或者 touchmove 在一个很小的范围(如下图)。限制 touchmove 在一个很小范围,是为了给用户一定的冗余空间,因为不能保证用户手指在接触屏幕的时候不发生轻微的位移。
3.touchend 发生在 touchstart后的很短时间内(如下图)。这个时间段的阈值是毫秒级,用来限制手指和屏幕接触的时间。因为单击事件从开始到结束是很快的。

有了上面的流程,就可以开始实现 tap 事件监测了。
_getTime() {
return new Date().getTime();
}
_onTouchStart(e) {
//记录touch开始的位置
this.startX = e.touches[0].pageX;
this.startY = e.touches[0].pageY;
if(e.touches.length > 1) {
//多点监测
...
}else {
//记录touch开始的时间
this.startTime = this._getTime();
}
}
_onTouchMove(e) {
...
//记录手指移动的位置
this.moveX = e.touches[0].pageX;
this.moveY = e.touches[0].pageY;
...
}
_onTouchEnd(e) {
let timestamp = this._getTime();
if(this.moveX !== null && Math.abs(this.moveX - this.startX) > 10 ||
this.moveY !== null && Math.abs(this.moveY - this.startY) > 10) {
...
}else {
//手指移动的位移要小于10像素并且手指和屏幕的接触时间要短语500毫秒
if(timestamp - this.startTime < 500) {
this._emitEvent('onTap')
}
}
}
双击(double tap)
和单击一样,双击事件也需要我们对手势进行量化分解。
双击事件是一个手指的行为。所以在 touchstart 时,我们要判断此时屏幕有几个接触点。
双击事件中包含两次独立的单击行为。理想情况下,这两次点击应该落在屏幕上的同一个点上。为了给用户一定的冗余空间,将两次点击的坐标点距离限制在10个像素以内。
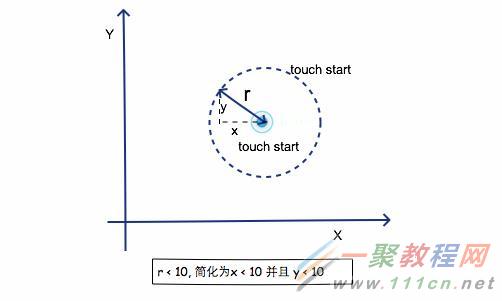
双击事件本质是两次快速的单击。也即是说,两次点击的间隔时间很短。通过一定的测试量化后,我们把两次单击的时间间隔设为300毫秒。

注意双击事件中我们检测了相邻两个 touchstart 事件的位移和时间间隔。
_onTouchStart(e) {
if(e.touches.length > 1) {
...
} else {
if(this.previousTouchPoint) {
//两次相邻的touchstart之间距离要小于10,同时时间间隔小于300ms
if( Math.abs(this.startX -this.previousTouchPoint.startX) < 10 &&
Math.abs(this.startY - this.previousTouchPoint.startY) < 10 &&
Math.abs(this.startTime - this.previousTouchTime) < 300) {
this._emitEvent('onDoubleTap');
}
}
//保存上一次touchstart的时间和位置信息
this.previousTouchTime = this.startTime;
this.previousTouchPoint = {
startX : this.startX,
startY : this.startY
};
}
}
长按(long press)
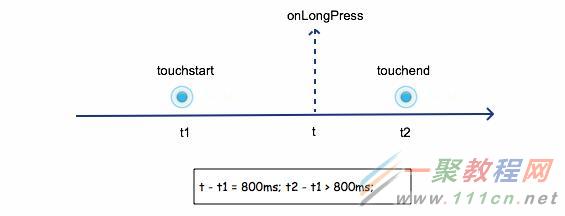
长按应该是最容易分解的手势。我们可以这样分解:在 touchstart 发生后的很长一段时间内,如果没有发生 touchmove 或者 touchend 事件,那么就触发长按手势。
长按是一个手指的行为,需要检测屏幕上是否只有一个接触点。
如果手指在空间上发生了移动,那么长按事件取消。
如果手指在屏幕上停留的时间超过800ms,那么触发长按手势。
如果手指在屏幕上停留的时间小于800ms,也即 touchend 在 touchstart 发生后的800ms内触发,那么长按事件取消。
_onTouchStart(e) {
clearTimeout(this.longPressTimeout);
if(e.touches.length > 1) {
}else {
this.longPressTimeout = setTimeout(()=>{
this._emitEvent('onLongPress');
});
}
}
_onTouchMove(e) {
...
clearTimeout(this.longPressTimeout);
...
}
_onTouchEnd(e) {
...
clearTimeout(this.longPressTimeout);
...
}
缩放(pinch)
缩放是一个非常有趣的手势,还记得第一代iPhone双指缩放图片给你带来的震撼吗?虽然如此,缩放手势的检测却相对简单。
缩放是两个手指的行为,需要检测屏幕上是否有两个接触点。
缩放比例的量化,是通过两次缩放行为之间的距离的比值得到,如下图。
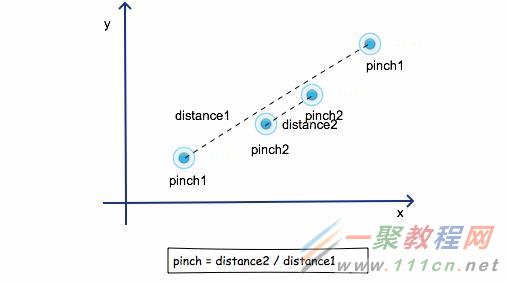
所以缩放的核心是获取两个接触点之间的直线距离。
//勾股定理
_getDistance(xLen,yLen) {
return Math.sqrt(xLen * xLen + yLen * yLen);
}
这里的xLen是两个接触点x坐标差的绝对值,yLen相应的就是y坐标差的绝对值。
_onTouchStart(e) {
if(e.touches.length > 1) {
let point1 = e.touches[0];
let point2 = e.touches[1];
let xLen = Math.abs(point2.pageX - point1.pageX);
let yLen = Math.abs(point2.pageY - point1.pageY);
this.touchDistance = this._getDistance(xLen, yLen);
} else {
...
}
}
在_onTouchStart函数中获取并且保存 touchstart 发生时两个接触点之间的距离。
_onTouchMove(e) {
if(e.touches.length > 1) {
let xLen = Math.abs(e.touches[0].pageX - e.touches[1].pageX);
let yLen = Math.abs(e.touches[1].pageY - e.touches[1].pageY);
let touchDistance = this._getDistance(xLen,yLen);
if(this.touchDistance) {
let pinchScale = touchDistance / this.touchDistance;
this._emitEvent('onPinch',{scale:pinchScale - this.previousPinchScale});
this.previousPinchScale = pinchScale;
}
}else {
...
}
}
旋转(rotate)
旋转手势需要检测两个比较重要的值,一是旋转的角度,二是旋转的方向(顺时针或逆时针)。
其中旋转角度和方向的计算需要通过向量的计算来获取,本文不再展开。
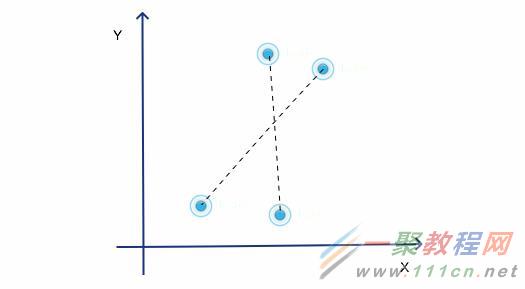
首先,需要获取向量的旋转方向和角度。
//这两个方法属于向量计算,具体原理请阅读本文最后的参考文献
_getRotateDirection(vector1,vector2) {
return vector1.x * vector2.y - vector2.x * vector1.y;
}
_getRotateAngle(vector1,vector2) {
let direction = this._getRotateDirection(vector1,vector2);
direction = direction > 0 ? -1 : 1;
let len1 = this._getDistance(vector1.x,vector1.y);
let len2 = this._getDistance(vector2.x,vector2.y);
let mr = len1 * len2;
if(mr === 0) return 0;
let dot = vector1.x * vector2.x + vector1.y * vector2.y;
let r = dot / mr;
if(r > 1) r = 1;
if(r < -1) r = -1;
return Math.acos(r) * direction * 180 / Math.PI;
}
然后,我们在手指发生移动时,调用获取旋转方向和角度的方法。
_onTouchStart(e) {
...
if(e.touches.length > 1) {
this.touchVector = {
x: point2.pageX - this.startX,
y: point2.pageY - this.startY
};
}
...
}
_onTouchMove(e) {
...
if(this.touchVector) {
let vector = {
x: e.touches[1].pageX - e.touches[0].pageX,
y: e.touches[1].pageY - e.touches[0].pageY
};
let angle = this._getRotateAngle(vector,this.touchVector);
this._emitEvent('onRotate',{
angle
});
this.touchVector.x = vector.x;
this.touchVector.y = vector.y;
}
...
}
实战
好了,我们的手势系统到这里就完成了。接下来要在实战中检验这套系统是否可靠,做一个简单的图片浏览器,支持图片缩放,旋转,移动,长按。
首先,做好dom规划,和[之前]一样,我们的事件监听机制并不直接作用在图片上,而是作用在图片的父元素上。
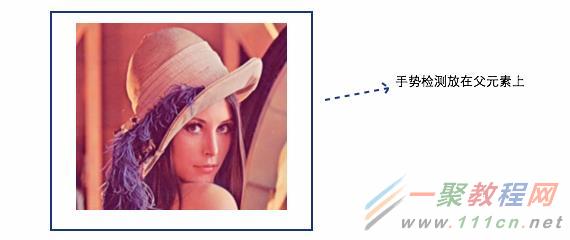
然后,可以开始使用上面的手势检测系统了。
render() {
return (

);
}
由于我们的手势系统检测的增量,因此不能直接把增量应用在对象上,而是需要把这些增量累加。以旋转为例:
onRotate(event) {
//对增量进行累加
this.angle += event.angle
this.setState({
angle:this.angle
});
}
至此,我们的手势检测就完成了。
相关文章
- 《弓箭传说2》新手玩法介绍 01-16
- 《地下城与勇士:起源》断桥烟雨多买多送活动内容一览 01-16
- 《差不多高手》醉拳龙技能特点分享 01-16
- 《鬼谷八荒》毕方尾羽解除限制道具推荐 01-16
- 《地下城与勇士:起源》阿拉德首次迎新春活动内容一览 01-16
- 《差不多高手》情圣技能特点分享 01-16


