最新下载
热门教程
- 1
- 2
- 3
- 4
- 5
- 6
- 7
- 8
- 9
- 10
PHP-5.5.x + Xdebug + Zend Studio 调试环境设置
时间:2022-06-24 16:22:03 编辑:袖梨 来源:一聚教程网
1、下载安装xdebug
1.1 到http://xdebug.org/download.php 下载适合你的PHP版本的xdebug
1.2 复制到php安装目录的ext文件夹,改名为php_xdebug.dll
1.3 配置xdebug
在php.ini尾部添加如下
[xdebug]
zend_extension="php_xdebug.dll"
xdebug.remote_enable = On
xdebug.remote_host = "localhost"
xdebug.remote_port = 9000
xdebug.remote_handler = "dbgp"
xdebug.auto_trace = 1
xdebug.collect_includes = 1
xdebug.collect_params = 1
xdebug.collect_return = 1
xdebug.default_enable = 1
xdebug.collect_assignments = 1
xdebug.collect_vars = 1
xdebug.remote_autostart = 1
xdebug.remote_connect_back = 1
xdebug.show_local_vars = 1
xdebug.show_exception_trace = 0
运行phpinfo();看有xdebug模块信息出来就是搞定了。
2、配置Zend Studio 支持xdebug
这里的配置很重要
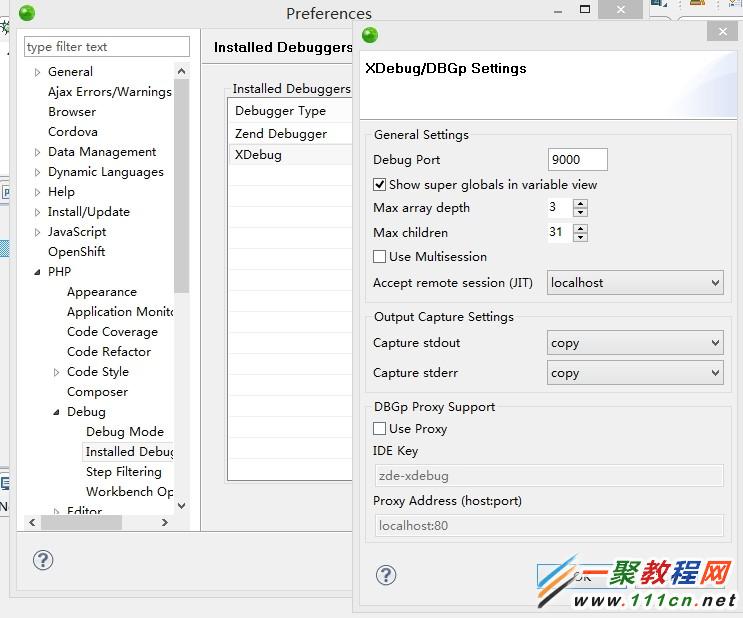
选择Zend Studio 的 Window 》 Preference 》 PHP 》Installed Debuggers 双击 Xdebug,弹出对话框如下图
Debug Port 设为跟php.ini中设置的一样(默认是9000)。
Accept remote session(JIT) 选择localhost
允许浏览器访问网站时zend studio自动打开文件开始调试。
选项说明: http://www.111com.net
off: 关闭浏览器访问时打开调试功能;
localhost: 通过localhost访问网页的时候打开调试。
any:只要访问服务器上的php都打开调试;
prompt:访问服务器上的php时弹出询问是否要调试。
一旦打开zend studio允许xebug调试,所有访问php页面都会进入调试。
我们可以使用easy xdebug火狐插件可在客户端控制是否开启调试。
1、首先php.ini设置
xdebug.remote_autostart = 0
不自动启动调试。
2、安装火狐插件easy xdebug,
安装好该插件后,点击如下图右下角小绿虫后,虫子上面有个小红点,这时候我们访问测试服务器的时候,Zend Studio就回自动弹出调试。

另外,可设置使用xdebug,在zend studio中对直接调试php文档,这里就不多说了。
Views – 61
相关文章
- CF手游boss卡上限重置时间攻略 04-25
- 蛋仔派对爆爆狐技能最强搭配指南 04-25
- 深空之眼震离月读搭配方案推荐 04-25
- 以闪亮之名玩呐第13章如何快速通关 04-25
- 决胜巅峰大铁罐最强怎样出装最合适 04-25
- 以闪亮之名食谱领悟流程哪几种 04-25


