最新下载
热门教程
- 1
- 2
- 3
- 4
- 5
- 6
- 7
- 8
- 9
- 10
Python利用subplots_adjust方法解决图表与画布的间距问题代码方法
时间:2022-06-25 01:17:15 编辑:袖梨 来源:一聚教程网
本篇文章小编给大家分享一下Python利用subplots_adjust方法解决图表与画布的间距问题代码方法,文章代码介绍的很详细,小编觉得挺不错的,现在分享给大家供大家参考,有需要的小伙伴们可以来看看。
1.问题情境
我们使用python的 matplotlib库绘图时,可能会遇到图片内容显示不全的情况,
以下边代码为例:
import matplotlib.pyplot as plt
plt.rcParams['font.sans-serif'] = ['SimHei']
plt.rcParams['axes.unicode_minus'] = False
x = range(9)
y = [5.12, 5.15, 5.13, 5.10, 5.2, 5.25, 5.19, 5.24, 5.31]
c = 0.5 * (min(x) + max(x))
d = min(y) + 0.3 * (max(y)-min(y))
plt.plot(x, y, label='股票A收盘价', c='k', ls='-.', marker='D', lw=2)
plt.xticks(x, [
	'2022-03-27', '2022-03-28', '2022-03-29', '2022-03-30',
	'2022-03-31', '2022-04-01', '2022-04-04', '2022-04-05',
	'2022-04-06'], rotation=45)
plt.title('某股票收盘价时序图')
plt.xlabel('日期')
plt.ylabel('价格')
plt.grid(True)
plt.legend()

# 标出每天的收盘价
for a, b in zip(x, y):
	plt.text(a, b+0.01, '%.1f'%b, ha='center', va='bottom', fontsize=9)

plt.annotate('最低价', (x[y.index(min(y))], min(y)), (x[y.index(min(y))] + 2, min(y)+0.06), xycoords='data',
			 arrowprops=dict(,head,headlength=20, facecolor='g',shrink=0.05), c='r',fontsize=20)
plt.show()
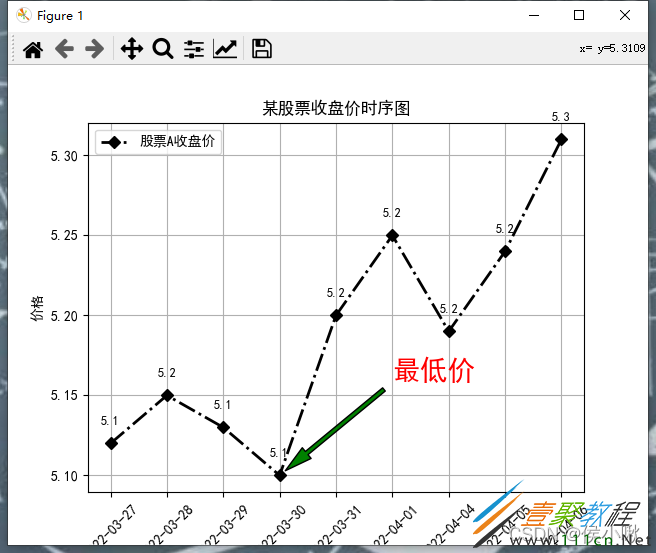
图像效果如图所示,图像底部x轴的表示日期的标签,没有被显示完全:
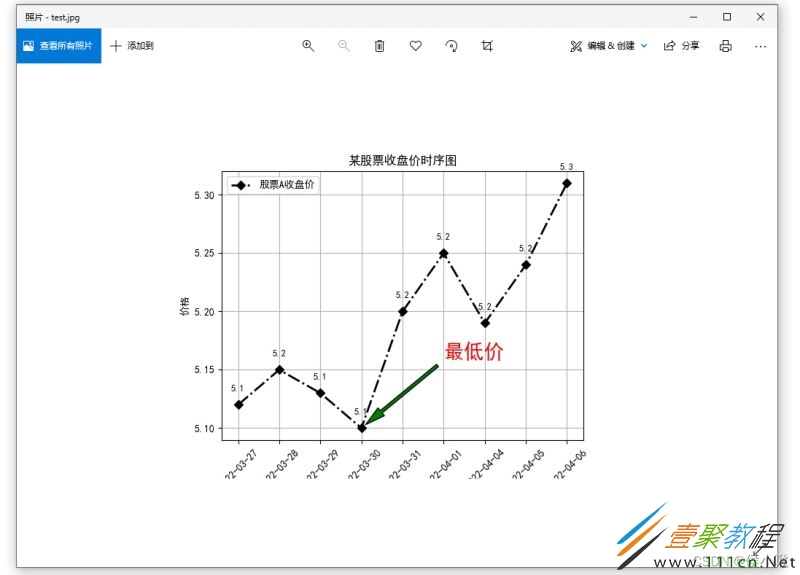
虽然,有的知道的同学可能会告诉我,只要把窗口放大,就可以显示得完整了。确实如此。但是这仅仅只能满足我们的一般需求。如果我们的程序需要自动化生成图表并保存,这个方法就失效了。使用plt.savefig()保存出的图片文件如下图所示,这并不是我们想要的:
这样的场景下,subplots_adjust()方法的应用则恰到好处。
2. plt.subplots_adjust()概述
plt.subplots_adjust()方法常用的参数有6个。
其语法如下:
plt.subplots_adjust(left=None, bottom=None, right=None, top=None, wspace=None, hspace=None)
其中,left, bottom, right, top依次表示四个方向上的,图表与画布边缘之间的距离。
这四个参数的每个参数的取值范围通常都在0-1之间。与其说是“间距”,倒不如说是图像边缘的“坐标”更确切。使用这四个参数时,将画布左下角视为坐标原点,画布的宽和高都视为1。如果参数取值大于1,则可能会出现图像的损失,图像会移动到画布之外,而不会报错。
且left不能大于等于right,bottom不能大于等于top,如果违反这一点则会发生报错。
wspace和 hspace则分别表示水平方向上图像间的距离和垂直方向上图像间的距离。其的取值是可以取得大于1,具体的则具体情形自行调试选出合适的。这两个参数用于画布有多个子图时。
3. 案例展示
3.1 单图情形
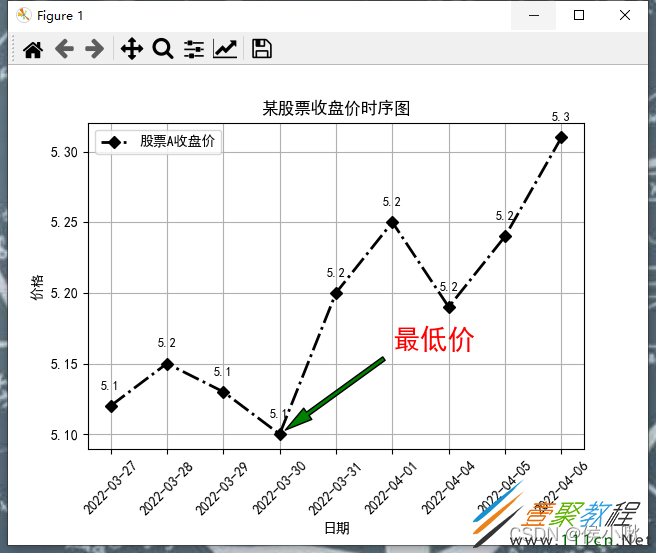
依然以第一部分中的示例为例,将表示图表与下边缘的距离 的参数 bottom设成0.2。
即在上边代码的基础上加上一句:
plt.subplots_adjust(bottom=0.2)
则图像效果发生以下改变:
3.2 多子图情形
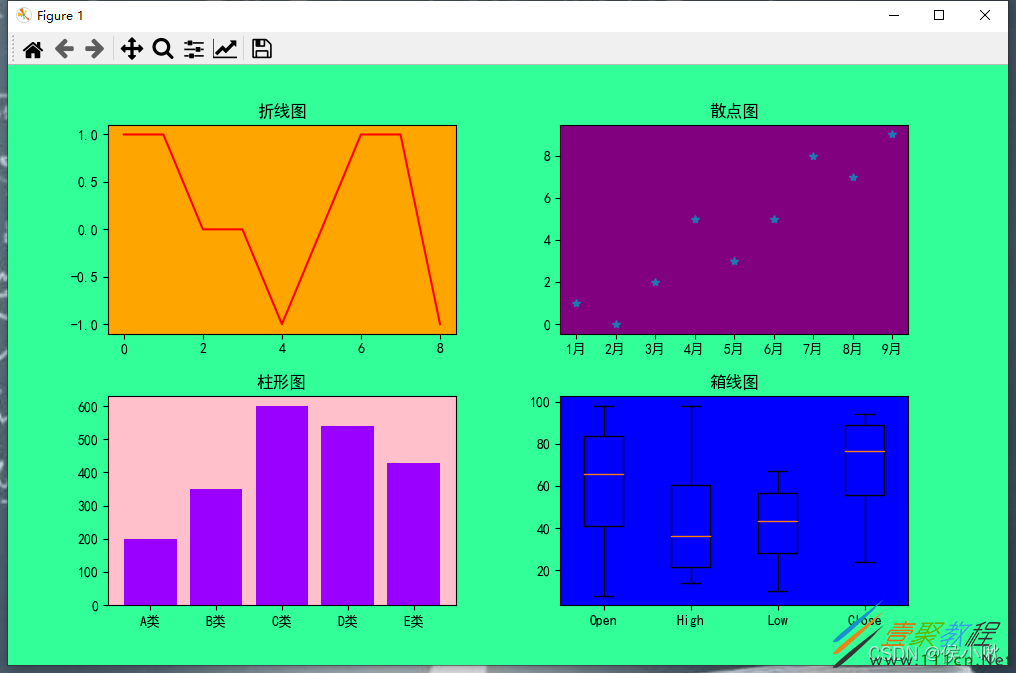
在画布上绘制以下四幅图像。并设定上下左右及图像间的间距。
依次在左上绘制一幅折线图,右上绘制一幅散点图,
左下绘制一幅柱状图,右下绘制一幅箱线图。
并设定间距:
plt.subplots_adjust(left=0.1, right=0.9, bottom=0.1, top=0.9, wspace=0.3, hspace=0.3)
代码如下:
import matplotlib.pyplot as plt
import numpy as np
plt.rcParams['font.sans-serif'] = ['SimHei']
plt.rcParams['axes.unicode_minus'] = False
# 位置221 画一幅简单的折线图
fig = plt.figure(1, facecolor='#33ff99', figsize=(10, 6))
ax1 = plt.subplot(221)
ax1.set_title('ax1')
ax1.set_facecolor("orange")
ax1.plot([1, 1, 0, 0, -1, 0, 1, 1, -1], c='r')
# 位置222 或一个横轴为月份,的散点图
ax2 = plt.subplot(222)
ax2.set_title('ax2')
ax2.set_facecolor("purple")
ax2.plot(['1月', '2月', '3月', '4月', '5月', '6月', '7月', '8月', '9月'], [1, 0, 2, 5, 3, 5, 8, 7, 9], ls='', marker='*')
# 位置223 绘制一份柱状图
ax3 = plt.subplot(223)
ax3.set_title('ax3')
ax3.set_facecolor("pink")
ax3.bar(['A类', 'B类', 'C类', 'D类', 'E类'], #9900ff')
# 位置224 绘制一张箱线图
ax4 = plt.subplot(224)
ax4.set_title('ax4')
np.random.seed(100)
data = np.random.randint(0, 100, (4, 4))
ax4.set_facecolor("blue")
ax4.boxplot(data, labels=('Open', 'High', 'Low', 'Close'))
# 添加标题
ax1.set_title('折线图')
ax2.set_title('散点图')
ax3.set_title('柱形图')
ax4.set_title('箱线图')
plt.subplots_adjust(left=0.1, right=0.9, bottom=0.1, top=0.9, wspace=0.3, hspace=0.3)
plt.show()
生成图像效果如下:
相关文章
- 反义词 04-28
- 二货囧事,笑搞的很出彩 04-28
- 胖子你又来逗大家笑 04-28
- 父子逗段,搞笑的很呐! 04-28
- 年过的开心不?看笑段就知道了 04-28
- 嘿嘿,这些人让大家很无语哟! 04-28


