最新下载
热门教程
- 1
- 2
- 3
- 4
- 5
- 6
- 7
- 8
- 9
- 10
OpenCV-Python实现轮廓的特征值代码示例
时间:2022-06-25 01:56:58 编辑:袖梨 来源:一聚教程网
本篇文章小编给大家分享一下OpenCV-Python实现轮廓的特征值代码示例,文章代码介绍的很详细,小编觉得挺不错的,现在分享给大家供大家参考,有需要的小伙伴们可以来看看。
在轮廓中,我们可以通过来描述轮廓,例如矩形的轮廓为:
=宽度/高度
下面,我们来计算矩形轮廓的,代码如下:
import cv2

img = cv2.imread("26_1.jpg")
cv2.imshow("img", img)

# 转换为灰度图像
gray = cv2.cvtColor(img, cv2.COLOR_BGR2GRAY)

ret, binary = cv2.threshold(gray, 127, 255, cv2.THRESH_BINARY)
contours, hierarchy = cv2.findContours(binary, cv2.RETR_LIST, cv2.CHAIN_APPROX_SIMPLE)

x, y, w, h = cv2.boundingRect(contours[0])
cv2.rectangle(img, (x, y), (x + w, y + h), (0, 0, 255), 3)
cv2.imshow("img1", img)

aspectRatio=float(w)/h
print(aspectRatio)

cv2.waitKey()
cv2.destroyAllWindows()
运行之后,我们可以得到轮廓的约为3:
Extend
我们还可以使用轮廓面积与矩形边界面积之比Extend来描述图像及其轮廓特征,数学计算公式图下:
Extend=轮廓面积/矩形边界面积
下面,我们来计算Extend,代码如下:
import cv2

img = cv2.imread("26_1.jpg")
cv2.imshow("img", img)

# 转换为灰度图像
gray = cv2.cvtColor(img, cv2.COLOR_BGR2GRAY)

ret, binary = cv2.threshold(gray, 127, 255, cv2.THRESH_BINARY)
contours, hierarchy = cv2.findContours(binary, cv2.RETR_LIST, cv2.CHAIN_APPROX_SIMPLE)

x, y, w, h = cv2.boundingRect(contours[0])
rectArea=w*h#矩形边界面积
cntArea=cv2.contourArea(contours[0])#轮廓面积
extend=float(cntArea)/rectArea
print(extend)
本例中,轮廓面积与矩形边界面积的比值Extend大约为0.8:
Solidity
我们还可以使用轮廓面积与凸包面积之比Solidity来衡量图像,轮廓以及凸包的特征。其数学计算公式为:
Slidity=轮廓面积/凸包面积
下面,我们来计算Slidity,代码如下:
import cv2

img = cv2.imread("26_1.jpg")
cv2.imshow("img", img)

# 转换为灰度图像
gray = cv2.cvtColor(img, cv2.COLOR_BGR2GRAY)

ret, binary = cv2.threshold(gray, 127, 255, cv2.THRESH_BINARY)
contours, hierarchy = cv2.findContours(binary, cv2.RETR_LIST, cv2.CHAIN_APPROX_SIMPLE)

x, y, w, h = cv2.boundingRect(contours[0])
cntArea=cv2.contourArea(contours[0])#轮廓面积
hull=cv2.convexHull(contours[0])
hullArea=cv2.contourArea(hull)#凸包面积
solidity=float(cntArea)/hullArea
print(solidity)
运行之后,本例轮廓面积与凸包面积的比值solidity约为1:
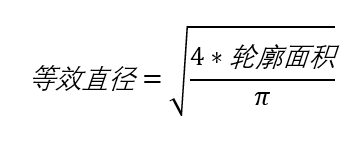
在OpenCV中,我们还可以使用来衡量轮廓的特征值,该值是与轮廓面积相等的圆形的直径。其数学计算公式为:
下面,我们来计算与轮廓面积相等的圆形直径,代码如下:
import cv2
import numpy as np

img = cv2.imread("26_1.jpg")
cv2.imshow("img", img)

# 转换为灰度图像
gray = cv2.cvtColor(img, cv2.COLOR_BGR2GRAY)

ret, binary = cv2.threshold(gray, 127, 255, cv2.THRESH_BINARY)
contours, hierarchy = cv2.findContours(binary, cv2.RETR_LIST, cv2.CHAIN_APPROX_SIMPLE)

x, y, w, h = cv2.boundingRect(contours[0])
cntArea=cv2.contourArea(contours[0])#轮廓面积
equiDiameter=np.sqrt(4*cntArea/np.pi)
print(equiDiameter)
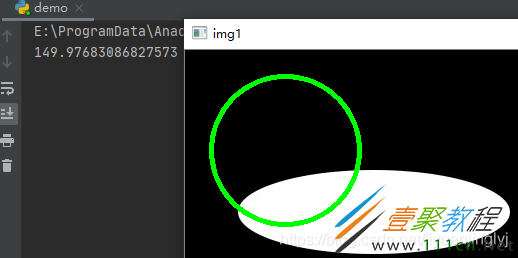
cv2.circle(img,(100,100),int(equiDiameter/2),(0,255,0),3)
cv2.imshow("img1",img)
cv2.waitKey()
cv2.destroyAllWindows()
运行之后,我们得到其约为145:
方向
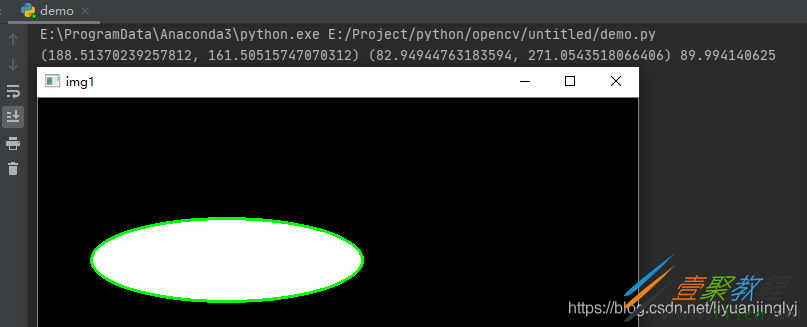
在OpenCV中,函数cv2.fitEllipse()可以用来构建最优拟合,还可以在返回值内分别返回的中心点,轴长,旋转角度信息。使用这种形式,能够直观地获取的方向等信息。
函数cv2.fitEllipse()返回值为:
(x,y):的中心点
(MA,ma):水平方向轴与垂直方向轴的长度
angle:的旋转角度
import cv2

img = cv2.imread("26_1.jpg")
cv2.imshow("img", img)

# 转换为灰度图像
gray = cv2.cvtColor(img, cv2.COLOR_BGR2GRAY)

ret, binary = cv2.threshold(gray, 127, 255, cv2.THRESH_BINARY)
contours, hierarchy = cv2.findContours(binary, cv2.RETR_LIST, cv2.CHAIN_APPROX_SIMPLE)

ellipsis=cv2.fitEllipse(contours[0])

(x, y), (MA, ma), angle = cv2.fitEllipse(contours[0])

print((x, y), (MA, ma), angle)

cv2.ellipse(img, ellipsis, (0, 255, 0), 2)
cv2.imshow("img1", img)
cv2.waitKey()
cv2.destroyAllWindows()
本来就是图,下面拟合后正好也是:
掩摸和像素点
有时候,我们还像获取某对象的掩摸图像及其对应的点。在OpenCV中,它还提供了cv2.findNonZero()函数用于获取一个图像内的,其完整定义如下:
def findNonZero(src, idx=None):
src:要查找非零元素的图像
idx:返回值,表示非0元素的索引位置。具体格式为(行号,列号)
下面,我们实测该函数,代码如下:
import cv2
import numpy as np

img = cv2.imread("26_1.jpg")

cv2.imshow("img", img)

# 转换为灰度图像
gray = cv2.cvtColor(img, cv2.COLOR_BGR2GRAY)

ret, binary = cv2.threshold(gray, 127, 255, cv2.THRESH_BINARY)
contours, hierarchy = cv2.findContours(binary, cv2.RETR_LIST, cv2.CHAIN_APPROX_SIMPLE)

mask=np.zeros(gray.shape,np.uint8)
cv2.drawContours(mask,[contours[0]],0,255,2)
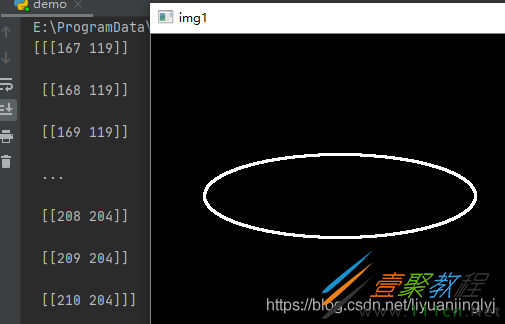
pixelpoints=cv2.findNonZero(mask)
print(pixelpoints)

cv2.imshow("img1", mask)
cv2.waitKey()
cv2.destroyAllWindows()
运行之后,我们会得到:
最大值,以及它们的位置
在OpenCV中,它提供cv2.minMaxLoc()函数获取指定对象内最大值,以及位置等信息,其完整定义如下:
def minMaxLoc(src, mask=None):
src:单通道图像
mask:掩摸,通过使用掩摸图像,得到掩膜指定区域内的最值信息
该函数返回4个值:,最大值,位置,最大值位置。
下面,我们来获取这些值,代码如下:
import cv2
import numpy as np

img = cv2.imread("26_1.jpg")

cv2.imshow("img", img)

# 转换为灰度图像
gray = cv2.cvtColor(img, cv2.COLOR_BGR2GRAY)

ret, binary = cv2.threshold(gray, 127, 255, cv2.THRESH_BINARY)
contours, hierarchy = cv2.findContours(binary, cv2.RETR_LIST, cv2.CHAIN_APPROX_SIMPLE)

mask = np.zeros(gray.shape, np.uint8)
cv2.drawContours(mask, [contours[0]], 0, 255, 2)

min, max, min_loc, max_loc = cv2.minMaxLoc(gray, mask)
print(min, max, min_loc, max_loc)
运行之后,控制台输出4个值:
平均颜色及平均灰度
在OpenCV中,它给我们提供cv2.mean()函数计算一个对象的平均颜色与平均灰度。其完整定义如下:
def mean(src, mask=None):
参数与上面两个小节一样,这里不在赘述。下面,我们来使用这个函数,代码如下:
import cv2
import numpy as np

img = cv2.imread("26_1.jpg")


cv2.imshow("img", img)

# 转换为灰度图像
gray = cv2.cvtColor(img, cv2.COLOR_BGR2GRAY)

ret, binary = cv2.threshold(gray, 127, 255, cv2.THRESH_BINARY)
contours, hierarchy = cv2.findContours(binary, cv2.RETR_LIST, cv2.CHAIN_APPROX_SIMPLE)

mask=np.zeros(gray.shape,np.uint8)
cv2.drawContours(mask,[contours[0]],0,255,2)

mean=cv2.mean(img,mask)
运行之后,输出4个值:RGB以及A通道的均值:
极点
有时候,我们希望获取某个对象内的极点,比如最左,最右,最上,最下等。在OpenCV中,它给我们提供了以下方法进行获取:
left=tuple(cnt[cnt[:,:,0].argmin()][0])
right=tuple(cnt[cnt[:,:,0].argmax()][0])
top=tuple(cnt[cnt[:,:,1].argmin()][0])
bottom=tuple(cnt[cnt[:,:,1].argmax()][0])
下面,我们来通过这些方法获取,代码如下:
import cv2
import numpy as np

img = cv2.imread("26_1.jpg")

cv2.imshow("img", img)

# 转换为灰度图像
gray = cv2.cvtColor(img, cv2.COLOR_BGR2GRAY)

ret, binary = cv2.threshold(gray, 127, 255, cv2.THRESH_BINARY)
contours, hierarchy = cv2.findContours(binary, cv2.RETR_LIST, cv2.CHAIN_APPROX_SIMPLE)

mask = np.zeros(img.shape, np.uint8)
cnt = contours[0]
left = tuple(cnt[cnt[:, :, 0].argmin()][0])
right = tuple(cnt[cnt[:, :, 0].argmax()][0])
top = tuple(cnt[cnt[:, :, 1].argmin()][0])
bottom = tuple(cnt[cnt[:, :, 1].argmax()][0])

print(left, right, top, bottom)

font = cv2.FONT_HERSHEY_SIMPLEX

cv2.putText(img, "left", left, font, 1, (0, 255, 0), 2)
cv2.putText(img, "right", right, font, 1, (0, 255, 0), 2)
cv2.putText(img, "top", top, font, 1, (0, 255, 0), 2)
cv2.putText(img, "bottom", bottom, font, 1, (0, 255, 0), 2)

cv2.imshow("result",img)
cv2.waitKey()
cv2.destroyAllWindows()
运行之后,值与效果如下:
相关文章
- 反义词 04-28
- 二货囧事,笑搞的很出彩 04-28
- 胖子你又来逗大家笑 04-28
- 父子逗段,搞笑的很呐! 04-28
- 年过的开心不?看笑段就知道了 04-28
- 嘿嘿,这些人让大家很无语哟! 04-28


