最新下载
热门教程
- 1
- 2
- 3
- 4
- 5
- 6
- 7
- 8
- 9
- 10
uploadify+asp.net(C#) 批量上传大文件实例源码
时间:2022-11-14 23:24:30 编辑:袖梨 来源:一聚教程网
YPE html PUBLIC "-//W3C//DTD HTML 4.0 Transitional//EN" "http://www.***w3.org/TR/REC-html40/loose.dtd">
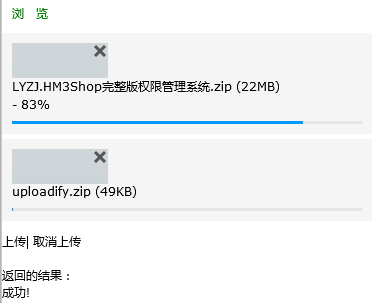
最近项目需求要批量上传大文件,项目是用asp.net(C#)开发的,uploadify上传组件个人认为非常优秀,支持asp.net、php等,本文我们就用uploadify实现批量上传大文件。
效果图:
前端代码带注释说明:
启用批量上传:
javascript:$('#uploadify').uploadify('upload','*'):启用批量上传。
关于大文件上传
在调试上传过程中,发现大文件(大于20M)就出现500错误了,服务器配置是可以上传500M的文件。我就想起应该是webconfig的请求内容大小的限制问题。应该按照如下设置:
设置请求数据大小。
服务器端代码如下:
public void ProcessRequest(HttpContext context)
{
    context.Response.ContentType = "text/plain";
    //接收上传后的文件
    HttpPostedFile file = context.Request.Files["Filedata"];
    //其他参数
    //string somekey = context.Request["someKey"];
    //string other = context.Request["someOtherKey"];
    //获取文件的保存路径
    string uploadPath =
        HttpContext.Current.Server.MapPath("UploadImages" + "\");
    //判断上传的文件是否为空
    if (file != null)
    {
        if (!Directory.Exists(uploadPath))
        {
            Directory.CreateDirectory(uploadPath);
        }
        //保存文件
        file.SaveAs(uploadPath + DateTime.Now.ToString("yyyyMMddHHmmsss") + file.FileName.Substring(file.FileName.LastIndexOf(".") - 1));
        ResponseModel rm = new ResponseModel();
        rm.Id = 1;
        rm.state = 0;
        rm.Msg = "成功";
        context.Response.Write(Newtonsoft.Json.JsonConvert.SerializeObject(rm));//即传给前台的data
    }
    else
    {
        context.Response.Write("0"); //即传给前台的data
    }
}
public class ResponseModel
{
    public int Id { get; set; }
    public int state { get; set; }
    public string Msg { get; set; }
}
其中上传成功后的返回对象可采用json序列化。然后返回给客户端调用。而在客户端调用的时候,建议先给返回的json字符串转换为json对象,这样可以方便使用。
如何处理上传结果返回的数据:
var obj = (new Function("return " + data))();//data为返回的json字符串
相关文章
- 羊蹄山之魂泽景祭坛在哪里 羊蹄山之魂泽景祭坛位置详情 01-05
- pixiv网页版手机入口-Pixiv手机网页版直达地址 01-05
- 百度网盘网页版入口直达-百度网盘网页版官方地址 01-05
- 羊蹄山之魂隐秘祭坛在哪里 羊蹄山之魂隐秘祭坛位置详情 01-05
- 羊蹄山之魂琥憩祭坛在哪里 羊蹄山之魂琥憩祭坛位置详情 01-05
- 易企秀网页版直达-h5易企秀官网直连 01-05


