最新下载
热门教程
- 1
- 2
- 3
- 4
- 5
- 6
- 7
- 8
- 9
- 10
Java编写实现窗体程序显示日历代码示例
时间:2022-06-29 01:44:41 编辑:袖梨 来源:一聚教程网
本篇文章小编给大家分享一下Java编写实现窗体程序显示日历代码示例,文章代码介绍的很详细,小编觉得挺不错的,现在分享给大家供大家参考,有需要的小伙伴们可以来看看。
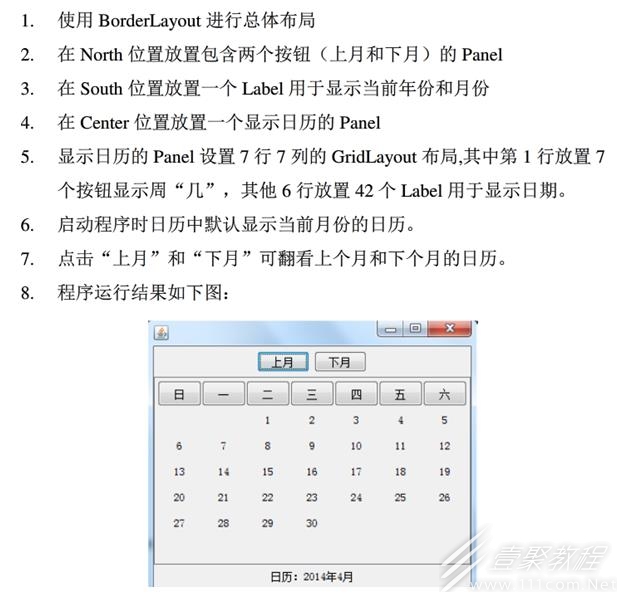
实训要求:
代码:
Test类:
import java.awt.*;
import java.awt.event.*;
import javax.swing.*;

public class Test extends JFrame {
    JButton week1, week2, week3, week4, week5, week6, week7, next, pro;
    CalendaBean cb = new CalendaBean();
    JLabel[] label;
    JLabel now;

    public static void main(String[] args) {
        Test frame = new Test();
        frame.setBounds(650,300,550,550);
        frame.setDefaultCloseOperation(JFrame.EXIT_ON_CLOSE);
        frame.setTitle("日历");
        frame.setVisible(true);

    }

    public Test() {
        int year, month;
        setLayout(new BorderLayout());
        JPanel pNorth = new JPanel();
        cb = new CalendaBean();
        cb.setYear(2017);
        cb.setMonth(11);
        String[] a = cb.getCalendar();
        next = new JButton("上月");
        pro = new JButton("下月");
        next.setActionCommand("lastmonth");
        pro.setActionCommand("nextmonth");
        next.addActionListener(new ActionListener() {
            public void actionPerformed(ActionEvent e) {
                cb.actionPerformed(e);
            }
        });
        pro.addActionListener(new ActionListener() {
            public void actionPerformed(ActionEvent e) {
                cb.actionPerformed(e);
            }
        });
        pNorth.add(next);
        pNorth.add(pro);
        add(pNorth, BorderLayout.NORTH);
        GridLayout grid = new GridLayout(8, 7);
        JPanel pCenter = new JPanel();
        week1 = new JButton("日");
        week2 = new JButton("一");
        week3 = new JButton("二");
        week4 = new JButton("三");
        week5 = new JButton("四");
        week6 = new JButton("五");
        week7 = new JButton("六");
        pCenter.add(week1);
        pCenter.add(week2);
        pCenter.add(week3);
        pCenter.add(week4);
        pCenter.add(week5);
        pCenter.add(week6);
        pCenter.add(week7);
        label = new JLabel[42];
        for (int i = 0; i < 42; i++) {
            label[i] = new JLabel();
            pCenter.add(label[i]);
        }
        cb.label = this.label;
        for (int i = 0; i < a.length; i++) {
            if (i % 7 == 0) {
                label[i].setText("");
            }
            label[i].setText("          "+a[i]);
        }
        pCenter.setLayout(grid);
        add(pCenter, BorderLayout.CENTER);
        JPanel pSouth = new JPanel();
        now = new JLabel();
        now.setText("日历:" + cb.year + "年" + cb.month + "月");
        cb.now = now;
        pSouth.add(now);
        add(pSouth, BorderLayout.SOUTH);
    }

}
CalendaBean类:
import java.awt.event.ActionEvent;
import java.awt.event.ActionListener;
import java.util.Calendar;

import javax.swing.*;
public class CalendaBean implements ActionListener {
    JLabel[] label;
    JLabel now;
    String[] day;
    int year = 0, month = 0;
    public void setYear(int year) {
        this.year = year;
    }

    public void setMonth(int month) {
        this.month = month;
    }

    public void actionPerformed(ActionEvent e) {
        String str = e.getActionCommand();
        if (str.equals("lastmonth")) {
            month--;
            if (month == 0) {
                month = 12;
                year--;
            }
        }
        else if (str.equals("nextmonth")) {
            month++;
            if (month == 13) {
                month = 1;
                year++;
            }
        }
        now.setText("日历:" + year + "年" + month + "月");
        String[] a = getCalendar();
        for (int i = 0; i < a.length; i++) {
            if (i % 7 == 0) {
                label[i].setText("");
            }
            label[i].setText("          "+a[i]);
        }

    }

    public String[] getCalendar() {
        String[] a = new String[42];
        Calendar rili = Calendar.getInstance();
        rili.set(year, month - 1, 1);
        int weekDay = rili.get(Calendar.DAY_OF_WEEK) - 1;
        int day = 0;
        if (month == 1 || month == 3 || month == 5 || month == 7 || month == 8
                || month == 10 || month == 12) {
            day = 31;
        }
        if (month == 4 || month == 6 || month == 9 || month == 11) {
            day = 30;
        }
        if (month == 2) {
            if ((year % 4 == 0) && (year % 100 != 0) || (year % 400 == 0))
                day = 29;
            else
                day = 28;
        }
        for (int i = 0; i < weekDay; i++)
            a[i] = "";
        for (int i = weekDay, n = 1; i < weekDay + day; i++) {
            a[i] = String.valueOf(n);
            n++;
        }
        for (int i = weekDay + day; i < a.length; i++)
            a[i] = "";
        return a;
    }
}
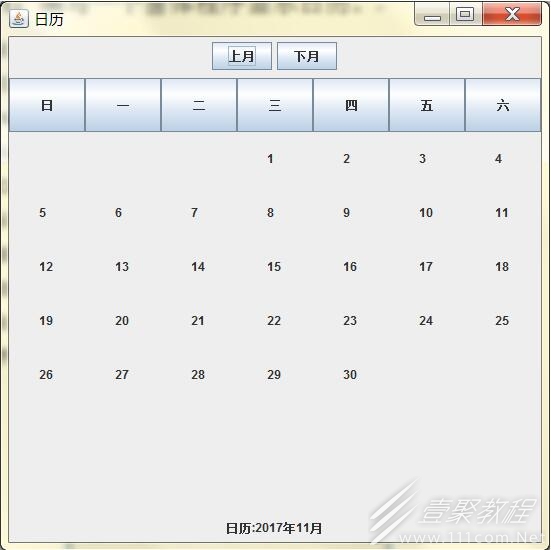
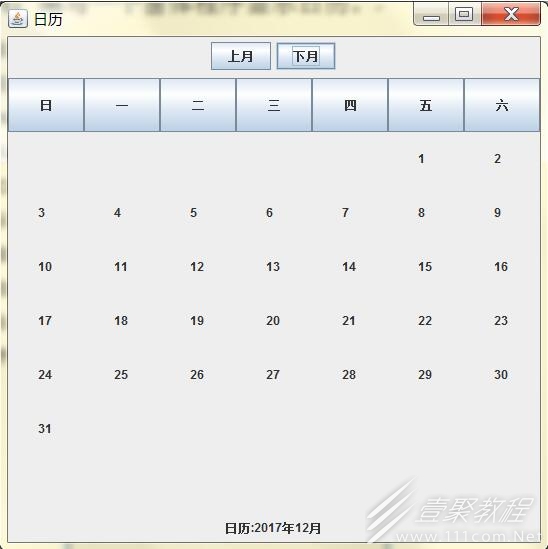
运行结果:
相关文章
- 《弓箭传说2》新手玩法介绍 01-16
- 《地下城与勇士:起源》断桥烟雨多买多送活动内容一览 01-16
- 《差不多高手》醉拳龙技能特点分享 01-16
- 《鬼谷八荒》毕方尾羽解除限制道具推荐 01-16
- 《地下城与勇士:起源》阿拉德首次迎新春活动内容一览 01-16
- 《差不多高手》情圣技能特点分享 01-16


