最新下载
热门教程
- 1
- 2
- 3
- 4
- 5
- 6
- 7
- 8
- 9
- 10
Spring Security实现自动登陆功能代码示例
时间:2022-06-29 02:05:58 编辑:袖梨 来源:一聚教程网
本篇文章小编给大家分享一下Spring Security实现自动登陆功能代码示例,文章代码介绍的很详细,小编觉得挺不错的,现在分享给大家供大家参考,有需要的小伙伴们可以来看看。
当我们在登录像QQ邮箱这种大多数的网站,往往在登录按键上会有下次自动登录这个选项,勾选后登录成功,在一段时间内,即便退出浏览器或者服务器重启,再次访问不需要用户输入账号密码进行登录,这也解决了用户每次输入账号密码的麻烦。
接下来实现自动登陆。
applicatio.properties配置用户名密码
spring.security.user.name=java
spring.security.user.password=java
controller层实现
@RestController
public class HelloController {

    @GetMapping("/hello")
    public String hello() {
        return "hello";
    }
}
配置类实现
@Configuration
public class SecurityConfig extends WebSecurityConfigurerAdapter {
    @Override
    protected void configure(HttpSecurity http) throws Exception {
    http.formLogin()
            .and()
            .authorizeRequests()
            .anyRequest()
            .authenticated()
            .and()
            .rememberMe()
            .and()
            .csrf().disable();
}
访问http://localh*o*s*t:8080/hello,此时系统会重定向到登录页面。
二话不说,输入账号密码,开搞!
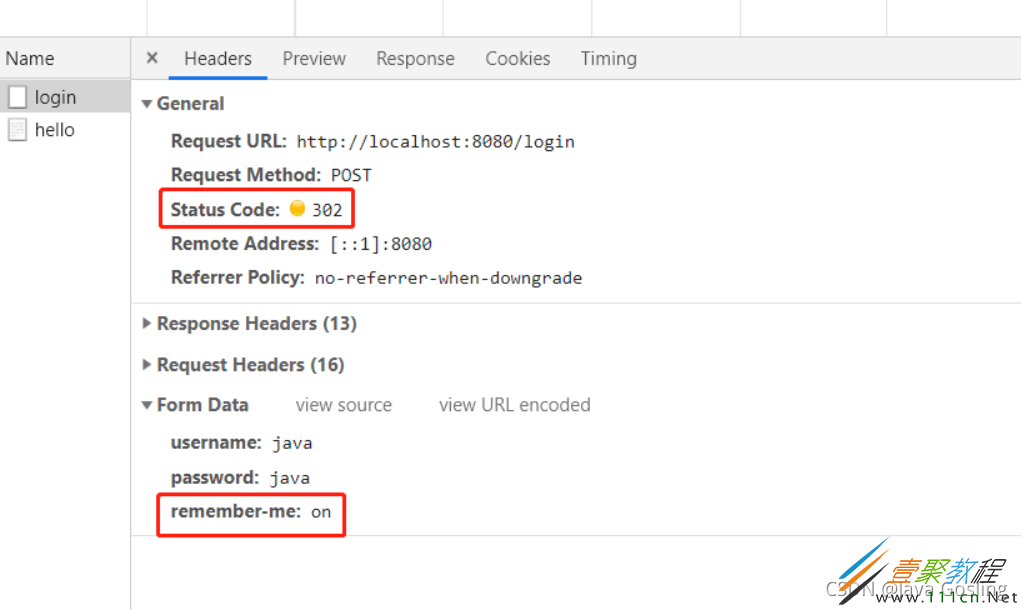
此时看到了登录数据remember-me的值为on,当自定义登陆框的时候应该知道如何定义key了吧。
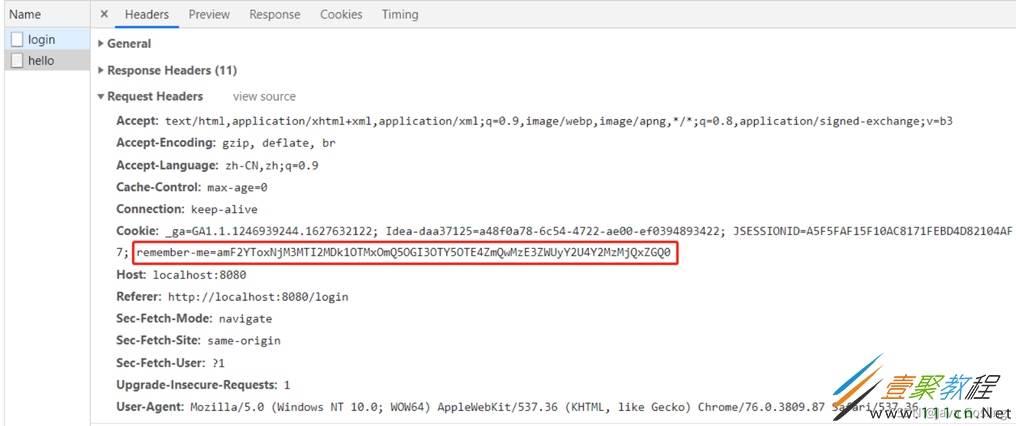
在hello接口,可以很清楚的看到cookie里保存了一个remember-me的令牌,这个就是自动登录的关键所在。
至于令牌是怎么生成的,先看一段源码。核心处理类TokenBasedRememberMeServices->onLoginSuccess
public void onLoginSuccess(HttpServletRequest request, HttpServletResponse response, Authentication successfulAuthentication) {
    //拿到用户名和密码
    String username = this.retrieveUserName(successfulAuthentication);
    String password = this.retrievePassword(successfulAuthentication);
    //用户名为空 打印日志
    if (!StringUtils.hasLength(username)) {
        this.logger.debug("Unable to retrieve username");
    } else {
        //密码为空 通过用户名再去查询
        if (!StringUtils.hasLength(password)) {
            UserDetails user = this.getUserDetailsService().loadUserByUsername(username);
            password = user.getPassword();
            //查到的密码还为空 打印日志 结束
            if (!StringUtils.hasLength(password)) {
                this.logger.debug("Unable to obtain password for user: " + username);
                return;
            }
        }
        //令牌有效期的生成 1209600是两周 也就是说令牌有效期14天
        int tokenLifetime = this.calculateLoginLifetime(request, successfulAuthentication);
        long expiryTime = System.currentTimeMillis();
        expiryTime += 1000L * (long)(tokenLifetime

	看完了核心的源码,也就知道了令牌的生成规则:username + “:” + tokenExpiryTime + “:” + password + “:” + key(key 是一个散列盐值,可以用来防治令牌被修改,通过MD5散列函数生成。),然后通过Base64编码。


	取出刚才的remember-me=amF2YToxNjM3MTI2MDk1OTMxOmQ5OGI3OTY5OTE4ZmQwMzE3ZWUyY2U4Y2MzMjQxZGQ0进行下验证。


	解码后是java:1637126095931:d98b7969918fd0317ee2ce8cc3241dd4,很明显java是username,1637126095931是两周后的tokenExpiryTime,d98b7969918fd0317ee2ce8cc3241dd4是password和key值的MD5加密生成的。


	需要注意的是key值是通过UUID随机生成的,当重启服务器时,UUID的变化会导致自动登录失败,所以为了避免之前生成的令牌失效,可以在配置中定义key值。

@Override
protected void configure(HttpSecurity http) throws Exception {
    http.formLogin()
            .and()
            .authorizeRequests()
            .anyRequest()
            .authenticated()
            .and()
            .rememberMe()
            .key("HelloWorld")
            .and()
            .csrf().disable();
}


	在Spring Security—登陆流程分析曾经说到 Spring Security中的认证授权都是通过过滤器来实现的。RememberMeAuthenticationFilter 是自动登录的核心过滤器。

public class RememberMeAuthenticationFilter extends GenericFilterBean implements ApplicationEventPublisherAware {
    private void doFilter(HttpServletRequest request, HttpServletResponse response, FilterChain chain)
      throws IOException, ServletException {
        //获取当前用户实例 继续过滤校验
   if (SecurityContextHolder.getContext().getAuthentication() != null) {
      this.logger.debug(LogMessage
            .of(() -> "SecurityContextHolder not populated with remember-me token, as it already contained: '"
                  + SecurityContextHolder.getContext().getAuthentication() + "'"));
      chain.doFilter(request, response);
      return;
   }
   //登录获取Auth
   Authentication rememberMeAuth = this.rememberMeServices.autoLogin(request, response);
   if (rememberMeAuth != null) {
      // Attempt authenticaton via AuthenticationManager
      try {
      //进行remember-me校验
         rememberMeAuth = this.authenticationManager.authenticate(rememberMeAuth);
         // Store to SecurityContextHolder
         //保存用户实例
         SecurityContextHolder.getContext().setAuthentication(rememberMeAuth);
         //成功页面跳转
         onSuccessfulAuthentication(request, response, rememberMeAuth);
         this.logger.debug(LogMessage.of(() -> "SecurityContextHolder populated with remember-me token: '"
               + SecurityContextHolder.getContext().getAuthentication() + "'"));
         if (this.eventPublisher != null) {
            this.eventPublisher.publishEvent(new InteractiveAuthenticationSuccessEvent(
                  SecurityContextHolder.getContext().getAuthentication(), this.getClass()));
         }
         if (this.successHandler != null) {
            this.successHandler.onAuthenticationSuccess(request, response, rememberMeAuth);
            return;
         }
      }
      catch (AuthenticationException ex) {
         this.logger.debug(LogMessage
               .format("SecurityContextHolder not populated with remember-me token, as AuthenticationManager "
                     + "rejected Authentication returned by RememberMeServices: '%s'; "
                     + "invalidating remember-me token", rememberMeAuth),
               ex);
         this.rememberMeServices.loginFail(request, response);
         //失败页面跳转
         onUnsuccessfulAuthentication(request, response, ex);
      }
   }
   chain.doFilter(request, response);
}
}

@Override
public final Authentication autoLogin(HttpServletRequest request, HttpServletResponse response) {
   //获取cookie
   String rememberMeCookie = extractRememberMeCookie(request);
   if (rememberMeCookie == null) {
      return null;
   }
   this.logger.debug("Remember-me cookie detected");
   if (rememberMeCookie.length() == 0) {
      this.logger.debug("Cookie was empty");
      cancelCookie(request, response);
      return null;
   }
   try {
       //解码cookie 拿到令牌
      String[] cookieTokens = decodeCookie(rememberMeCookie);
      //通过令牌获取UserdDetails
      UserDetails user = processAutoLoginCookie(cookieTokens, request, response);
      this.userDetailsChecker.check(user);
      this.logger.debug("Remember-me cookie accepted");
      return createSuccessfulAuthentication(request, user);
   }
   catch (CookieTheftException ex) {
      cancelCookie(request, response);
      throw ex;
   }
   catch (UsernameNotFoundException ex) {
      this.logger.debug("Remember-me login was valid but corresponding user not found.", ex);
   }
   catch (InvalidCookieException ex) {
      this.logger.debug("Invalid remember-me cookie: " + ex.getMessage());
   }
   catch (AccountStatusException ex) {
      this.logger.debug("Invalid UserDetails: " + ex.getMessage());
   }
   catch (RememberMeAuthenticationException ex) {
      this.logger.debug(ex.getMessage());
   }
   cancelCookie(request, response);
   return null;
}


	大致整体流程就是如果拿不到实例,则进行remember-me验证,通过autoLogin方法里获取cookie,解析令牌,拿到Auth,最后进行校验。之后剩下的和登陆流程分析的差不多。
相关文章
- 抖音官方充值入口-抖音充值活动任务奖励领取入口 12-18
- 哔哩哔哩在线免费畅看-2025哔哩哔哩b站网页版最新入口速览 12-18
- 一人之下漫画免费在线观看入口 | 实时缓存无延迟,网页直读免下载 12-18
- 免费PPT成品网站直播推荐-超全免费PPT模板网站盘点 12-18
- 学信网查学历-官方学历查询入口(一键验证学历信息) 12-18
- 虫虫漫画-免费漫画观看入口_海量正版漫画在线畅读平台 12-18


