


最新下载
热门教程
- 1
- 2
- 3
- 4
- 5
- 6
- 7
- 8
- 9
- 10
SpringBoot异步任务如何使用 SpringBoot异步任务使用方法
时间:2022-06-29 00:57:00 编辑:袖梨 来源:一聚教程网
本篇文章小编给大家分享一下SpringBoot异步任务使用方法,小编觉得挺不错的,现在分享给大家供大家参考,有需要的小伙伴们可以来看看。
步骤,如图所示:

1.添加异步任务业务类
package top.ytheng.demo.task;

import java.util.concurrent.Future;

import org.springframework.scheduling.annotation.Async;
import org.springframework.scheduling.annotation.AsyncResult;
import org.springframework.stereotype.Component;

//异步任务业务类
@Component
//标记此类是异步类,也可在方法中标记
//不加,则类里面的方法为同步执行
@Async
public class AsyncTask {

  public void task1() throws InterruptedException {
    long begin = System.currentTimeMillis();
    Thread.sleep(1000);
    long end = System.currentTimeMillis();
    System.out.println("任务1耗时:" + (end - begin));
  }

  public void task2() throws InterruptedException {
    long begin = System.currentTimeMillis();
    Thread.sleep(2000);
    long end = System.currentTimeMillis();
    System.out.println("任务2耗时:" + (end - begin));
  }

  public void task3() throws InterruptedException {
    long begin = System.currentTimeMillis();
    Thread.sleep(3000);
    long end = System.currentTimeMillis();
    System.out.println("任务3耗时:" + (end - begin));
  }

  //测试拿到返回结果
  public Future task4() throws InterruptedException {
    long begin = System.currentTimeMillis();
    Thread.sleep(1000);
    long end = System.currentTimeMillis();
    System.out.println("任务4耗时:" + (end - begin));
    return new AsyncResult("任务4");
  }

  public Future task5() throws InterruptedException {
    long begin = System.currentTimeMillis();
    Thread.sleep(2000);
    long end = System.currentTimeMillis();
    System.out.println("任务5耗时:" + (end - begin));
    return new AsyncResult("任务5");
  }

  public Future task6() throws InterruptedException {
    long begin = System.currentTimeMillis();
    Thread.sleep(3000);
    long end = System.currentTimeMillis();
    System.out.println("任务6耗时:" + (end - begin));
    return new AsyncResult("任务6");
  }
}
2.添加测试控制器
package top.ytheng.demo.controller;
import java.util.concurrent.ExecutionException;
import java.util.concurrent.Future;
import org.springframework.beans.factory.annotation.Autowired;
import org.springframework.web.bind.annotation.GetMapping;
import org.springframework.web.bind.annotation.RequestMapping;
import org.springframework.web.bind.annotation.RestController;
import top.ytheng.demo.task.AsyncTask;
@RestController
@RequestMapping("api/v1/async")
public class TaskController {
@Autowired
private AsyncTask asyncTask;
@GetMapping("/test")
public Object test() throws InterruptedException, ExecutionException {
long begin = System.currentTimeMillis();
//asyncTask.task1();
//asyncTask.task2();
//asyncTask.task3();
Future result1 = asyncTask.task4();
Future result2 = asyncTask.task5();
Future result3 = asyncTask.task6();
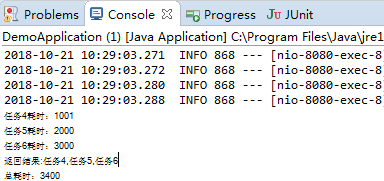
System.out.println("返回结果:" + result1.get() + "," + result2.get() + "," + result3.get());
for(;;) {
if(result1.isDone() && result2.isDone() && result3.isDone()) {
break;
}
}
long end = System.currentTimeMillis();
long total = end - begin;
System.out.println("总耗时:" + total);
return "总耗时:" + total;
}
}
3.添加启动类
package top.ytheng.demo;

import org.mybatis.spring.annotation.MapperScan;
import org.springframework.scheduling.annotation.EnableAsync;
import org.springframework.scheduling.annotation.EnableScheduling;

import org.springframework.boot.autoconfigure.SpringBootApplication;
import org.springframework.boot.web.servlet.ServletComponentScan;

@SpringBootApplication //等于下面3个
//@SpringBootConfiguration
//@EnableAutoConfiguration
//@ComponentScan
//拦截器用到
@ServletComponentScan
//MyBatis用到
@MapperScan("top.ytheng.demo.mapper")
//定时使用(开启定时任务)
@EnableScheduling
//开启异步任务
@EnableAsync
public class DemoApplication {

  public static void main(String[] args) {
    SpringApplication.run(DemoApplication.class, args);
  }
}
4.右键项目Run As启动,访问url
http://loc*alho*s*t:8080/api/v1/async/test
结果:
相关文章
- 趣智校园app如何注销账号 03-19
- 妖精漫画网页端官网首页入口在哪 03-19
- 卖座电影如何更换手机号 03-19
- 哔哩哔哩如何关闭弹幕 03-19
- 哪里能找到ao3镜像链接2021 03-19
- 高德地图路线规划不显示高速收费信息怎么办 03-19